
Cpt.Carnage
Well-known member
- Joined
- Oct 19, 2010
- Messages
- 1,749
- Thread Author
- #1
Hey All,
I recently decided that it was time to replace my PC. I built it 5 years ago (pretty much to the day) and it's served me well. Core 2 Duo 2.66ghz w/6gb ram and a GTX 280 for the video card.
But games and time moves on and it was starting to have issues (which for some reason have resolved them selves on there own, I think it knew it was being replaced).
So here's the specs for my new build:
Total Cost after Windows 7, tax and shipping, around $2200 CDN (note that's around $400 less then my older machine)
With all the materials gathered (after a 2wk wait for the motherboard, its brand new and was backorderd), I got started last night. It took around 3hrs to throw together (mainly because I went mental with cable management to keep the clutter down, and because I hooked a few quick swap bays up for future data expansion).
Onto the build pic's!
Here's the case (not my pic but I neglected to snap a naked picture of it before starting the cable routing). Its a full tower, meaning its almost a full 2 feet tall by 1.5 wide. They are large and heavy, but allow you to cram a TON of stuff into them.


Here's mine after a little tidying

After tucking the cables into the back for later sorting out and installing the brass standoffs for the motherboard, I moved on to installing the powersupply and SSD (which is in a really dumb spot in this case, there is a hot swap bay up top for 2.5" HDD but I didnt want to put my boot disc up there, it was a struggle to get it in and plugged in)

Now for the circuit porn, here's the motherboard, this thing is a E-ATX board so its around 12"x10" in size and weighs around 5lbs (because of the built in liquid cooling pipes, I may use them at a later date but they work just as well as a passive air cooler around the CPU).

Installed onto the tray, it takes up quite a lot of the compartment.

Onto the CPU Cooler, the H80 being a liquid radiator needs to be attached to your case first, then a back plate is added for extra support for the water block (you will see that in the tangle of cables behind the tray later). I had to remove one of the 140mm exhaust fans on the top and a 120mm one on the back of the system to make room for it. I had initially planned to mount it directly in line with the cpu but decided later to move it to the top of the case so as not to obstruct the motherboard.

Next the cpu is attached to the motherboard, pretty straightforward but caution is needed as any bent pins on the board pretty much ruins it. Attaching the water block was pretty tricky as the cooling lines kept getting in the way, afterwards you add the second fan to the radiator to finish things off.

Cable management time!! I cant recommend this enough, not only does it look way better on the other side of the board when you are done, it can help cut down on the dust buildup in the system and keep things running cooler. Still it ends up looking like a mess on this side of the board but since its covered by a solid panel don't worry about it too much. Just make sure you don't have any exposed wires kicking around and use zipties to secure things you wont need to move again. You can see the brace for the water block on the exposed portion of the motherboard here as well.

Onto ram, harddrives and videocards. This is pretty much the last step before you close it all up. Try and keep it neat and be aware that some force is allowed tucking cables away and plugging things in. You can see how silly the SSD position is in this case clearly here, took me 10 minutes to figure out how i was going to get power and data to it

Its ALIVE!!! Rather then removing my old computer for setting it up I just hooked it up to the TV.

And here's a neat shot, the 'Republic of Gamers' logo pulses with red light when the systems off and stays lit when on. I'm really liking the red colour scheme as my old PC had a bright blue which was almost blinding at night. This is more muted, more menacing. You can also see the light on the waterblock, you can adjust its settings by tapping the button on the front.

I can highly recommend a SSD for your own computer, this new machine boots into windows in less then 10 seconds.
If you are thinking about building your own PC I highly recommend it, this is around the 15th PC build I've done (most were for work). Your first one will be a bit scary but the majority of the time its pretty straight forward and you usually save around 500$ off of the equivalent pre-built system. NCIX.com (where I got most of the parts from) offers a service for $50 where they will build the system for you and stress test it to make sure its stable. Not a bad deal!
Thanks again to BirdOnAWire, tigger and lofp for being good sounding boards when I was selecting the parts for this build.
Now back to Minecraft! Wait.... why'd I build a monster computer just to play Minecraft...
I recently decided that it was time to replace my PC. I built it 5 years ago (pretty much to the day) and it's served me well. Core 2 Duo 2.66ghz w/6gb ram and a GTX 280 for the video card.
But games and time moves on and it was starting to have issues (which for some reason have resolved them selves on there own, I think it knew it was being replaced).
So here's the specs for my new build:
- Case: Antec DF-85
- Power: Antec CP-1000 1000Watt
- Motherboard: Asus Maximus V Formula
- Processor: Intel i5 3570k 3.4Ghz (3.8Ghz)
- Cooler: Corsair H80 Liquid Cooler
- Ram: Corsair Vengence 16GB DDR3 1600
- GPU: EVGA GTX680 Superclocked+
- Storage: Crucial M4 C400 256SSD, 1.5TB WD Black, 750GB from Old machine
- Optical: LG 12x Bluray /DVD-RW
Total Cost after Windows 7, tax and shipping, around $2200 CDN (note that's around $400 less then my older machine)
With all the materials gathered (after a 2wk wait for the motherboard, its brand new and was backorderd), I got started last night. It took around 3hrs to throw together (mainly because I went mental with cable management to keep the clutter down, and because I hooked a few quick swap bays up for future data expansion).
Onto the build pic's!
Here's the case (not my pic but I neglected to snap a naked picture of it before starting the cable routing). Its a full tower, meaning its almost a full 2 feet tall by 1.5 wide. They are large and heavy, but allow you to cram a TON of stuff into them.
Here's mine after a little tidying
After tucking the cables into the back for later sorting out and installing the brass standoffs for the motherboard, I moved on to installing the powersupply and SSD (which is in a really dumb spot in this case, there is a hot swap bay up top for 2.5" HDD but I didnt want to put my boot disc up there, it was a struggle to get it in and plugged in)
Now for the circuit porn, here's the motherboard, this thing is a E-ATX board so its around 12"x10" in size and weighs around 5lbs (because of the built in liquid cooling pipes, I may use them at a later date but they work just as well as a passive air cooler around the CPU).
Installed onto the tray, it takes up quite a lot of the compartment.
Onto the CPU Cooler, the H80 being a liquid radiator needs to be attached to your case first, then a back plate is added for extra support for the water block (you will see that in the tangle of cables behind the tray later). I had to remove one of the 140mm exhaust fans on the top and a 120mm one on the back of the system to make room for it. I had initially planned to mount it directly in line with the cpu but decided later to move it to the top of the case so as not to obstruct the motherboard.
Next the cpu is attached to the motherboard, pretty straightforward but caution is needed as any bent pins on the board pretty much ruins it. Attaching the water block was pretty tricky as the cooling lines kept getting in the way, afterwards you add the second fan to the radiator to finish things off.
Cable management time!! I cant recommend this enough, not only does it look way better on the other side of the board when you are done, it can help cut down on the dust buildup in the system and keep things running cooler. Still it ends up looking like a mess on this side of the board but since its covered by a solid panel don't worry about it too much. Just make sure you don't have any exposed wires kicking around and use zipties to secure things you wont need to move again. You can see the brace for the water block on the exposed portion of the motherboard here as well.
Onto ram, harddrives and videocards. This is pretty much the last step before you close it all up. Try and keep it neat and be aware that some force is allowed tucking cables away and plugging things in. You can see how silly the SSD position is in this case clearly here, took me 10 minutes to figure out how i was going to get power and data to it
Its ALIVE!!! Rather then removing my old computer for setting it up I just hooked it up to the TV.
And here's a neat shot, the 'Republic of Gamers' logo pulses with red light when the systems off and stays lit when on. I'm really liking the red colour scheme as my old PC had a bright blue which was almost blinding at night. This is more muted, more menacing. You can also see the light on the waterblock, you can adjust its settings by tapping the button on the front.
I can highly recommend a SSD for your own computer, this new machine boots into windows in less then 10 seconds.
If you are thinking about building your own PC I highly recommend it, this is around the 15th PC build I've done (most were for work). Your first one will be a bit scary but the majority of the time its pretty straight forward and you usually save around 500$ off of the equivalent pre-built system. NCIX.com (where I got most of the parts from) offers a service for $50 where they will build the system for you and stress test it to make sure its stable. Not a bad deal!
Thanks again to BirdOnAWire, tigger and lofp for being good sounding boards when I was selecting the parts for this build.
Now back to Minecraft! Wait.... why'd I build a monster computer just to play Minecraft...
")
 . Is the computer loud?
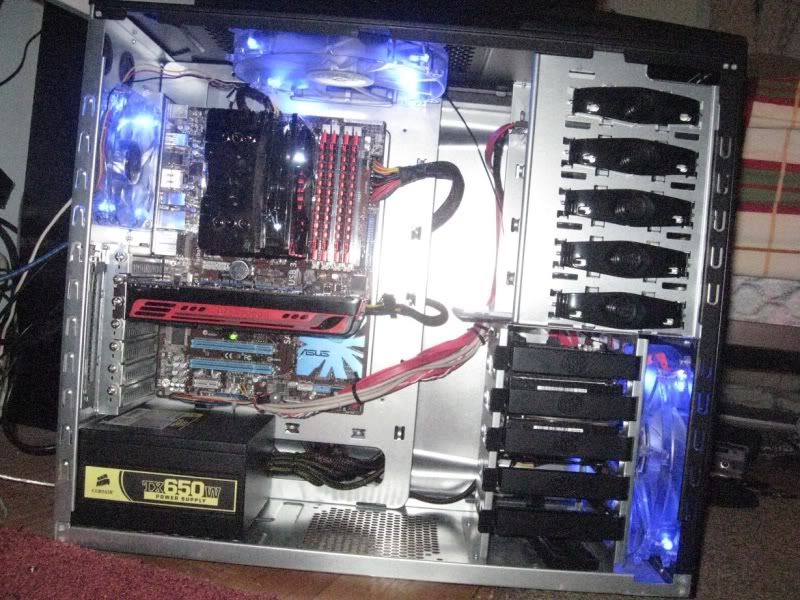

")